Lenses and Geometrical Optics
The Focal Length
We use lenses and mirrors everyday but sometimes don't really understand how and why they do what they do. In this section of the Readings, we'll learn a little more about how light interacts with such things as lenses and how this interaction can help us.
Most optical elements (mirrors, lenses) can be characterized by basically one quantity: their focal length. To understand focal length, we need to know something about the focal point.
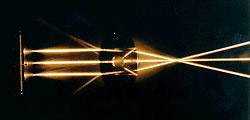
In the image above, note how the light rays, after they pass through the lens, converge on a single point. Below is a schematic drawing of the above situation.
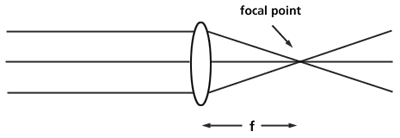
The single point to which the light rays are converging is called the focal point. The distance, f, from the lens to the focal point is the focal length. Each lens and mirror has its own focal length, which is its defining characteristic.
Note, however, that in showing the focal length of the lens above, we used light rays that were all parallel as they came to the lens. This isn't always the case: we can have light rays incident at different angles.
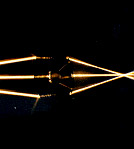
In the case above, the focal point is farther from the lens, because the incident rays were diverging as they came to the lens.
What would happen if the rays were already converging as they hit the lens? Where would we find the focal length in that case?
So when we discuss the "focal length" of a certain lens or mirror, we are usually referring to the focal length you get when a distant object's light rays (parallel light) are incident on the lens or mirror.
Real vs. Virtual
The lenses and mirrors that we are using in this module come in two basic flavors: convex and concave. The lenses A and B in your Optics Kit are called double convex lenses and have positive focal lengths. They have sides that bulge outwards and, as we saw above, converge light to a focal point. Lens C in your Kit is called a double concave lens and has a negative focal length. The concave lens has sides that bulge inward and diverge light.
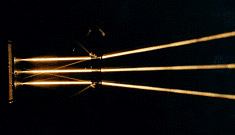
What does it mean for a lens to have a negative or positive focal length? A positive focal length means that the focal point of the lens is on the other side of the lens from where the object is placed. On the other hand, a negative focal length means that the focal point is on the same side of the lens as where the object is placed. This terminology is just a useful convention that allow physicists and engineers to characterize lenses and mirrors; it has no real physical meaning.
But how can we have an image on the same side of the lens as the object?
In an earlier activity, you tried to image (bring to a focus) the room lights with your various lenses. Did you get an image of the lights with your concave lens (Lens C)? Most likely not, since the concave lens, as we have seen, diverges light and can't bring light beams to a focus. The image, if there was one, would have been on the same side of the lens as the source (the light).
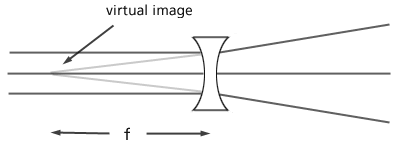
This kind of image on the same side as the source is called a virtual image . It's an image that isn't really there; the focal point in the drawing above is just the point where the rays would converge if they could. We can't focus the beams onto a piece of paper, for instance like you tried earlier. The strange thing about a virtual image, however, is that we can see it!
So what kind of image does a convex lens make? The drawing below shows us that a convex (positive) lens forms images on the side of the lens opposite the source.
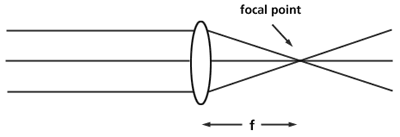
Since we can form an image on a piece of paper, we call this kind of image a real image. As you've probably guessed, we can also see real images.
The mirror tells all
Real and virtual images are not relegated to the domain of just the lenses -- if you want to see another virtual image look in your bathroom mirror. Or in the curved mirror on the passenger side of your car. Virtual images in a mirror form on the image side of a mirror, unlike that of lenses, in which the virtual image forms on the object side of the lens. Again, however, the virtual image is not a true image, in that it cannot be projected onto a screen. This is because the light rays reflecting off a plane mirror never converge, the major criterion for creating a real image. Likewise, light bouncing off a convex mirror never converge, thus these mirrors create virtual images.
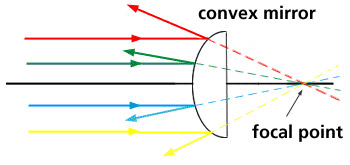
The dotted lines represent the extension of the reflected light rays if they could go through the mirror.
Only concave mirrors can create real images. When light hits the surface of a concave mirror, an individual light ray is reflected at an acute angle and all the light converges at a point on the object side of the mirror.
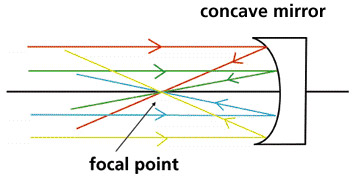
Most real images are seen inverted (upside-down) while virtual images are seen upright. Look in both faces of a well-polished spoon. One surface is a convex mirror, the other is a concave mirror: on which side is your image inverted?
Ray Tracing
We've seen how we can find the focal length of various types of lenses, and what the difference is between a real and a virtual image. Now we need to bring these concepts together so we can use them to our advantage.
Let's pretend for a moment that we live in a world in which the optometrists or opthamologists won't make our eyeglasses or contact lenses. If you had the raw materials and knew the prescription of your eyes (the eye doctors will at least do that service), how could you find the right lenses to make? We could make some lenses and test them until we found the right ones, but this might make our eyes pretty tired and would take a long time. If we knew the focal length of various lenses, we would be able to use a much more powerful technique to make our glasses.
Ray tracing allows us to "see" how light is going to behave when we have lenses and mirrors in the path of the light. If we know where the focal point of each lens and mirror is, we can figure out where the image of a certain object will be formed. This will tell us where the image will fall on our retina so we can see it.
The idea is to draw light rays emanating from the object through the optical system (lenses & mirrors). The diagram below shows how much of the light from the light source (a candle) passes through the lens and is imaged on the other side (notice that the ray that started at the top of the candle ends up below the ray that started at the bottom of the flame: the image is upside down).

Since there are an uncountable number of light rays (shaded area above) passing through the lens(es), it would be unreasonable to draw them all. Usually, we need draw only 2 or 3 rays from a point on the light source to represent all the rays coming from that point.
If we know the focal length of each of the lenses and/or mirrors, our 3 rays will show us where the image of a point from the source (or object) will be located.
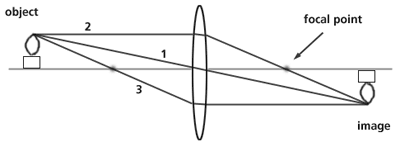
In the diagram above, I chose "special" rays to locate the image: the ray (1) passing through the center of the lens will always travel in a straight line without refracting; the ray (2) coming straight in from the candle top (parallel to the optical axis) is bent so it passes through the focal point on the other side of the lens; and the ray (3) passing through the focal point on the object (the left) side of the lens will be refracted so the light will exit the lens travelling parallel to the optical axis. A very similar diagram could be drawn for the light rays coming from the bottom of the candle, or from any other point on the candle.
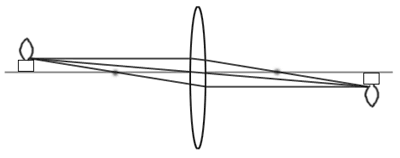
With this technique of tracing various rays from a light source, we can tell where an image will form and how it will be oriented: inverted or upright.
Want to try activities highlighting these principles? Click on the name of this activity to find an easy, hands-on experiment:


