The Ripple Tank

Water waves can be used as a model for understanding the behavior of light waves. A water wave is a pulse of energy moving through water. It has a high point, called the crest and a low point called the trough. The distance from crest to crest is identical to the distance from trough to trough and is known as the wavelength.
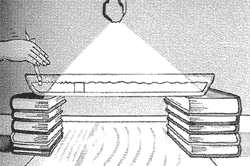
Scientists have traditionally studied waves with a device called a “ripple tank.” Using the swimming-pool effect, experimenters shine light onto a glass surface through water waves that are generated in shallow water. They project an image of the waves onto a white screen. It is the job of a research scientist to come up with questions and then to design ways to get answers. A ripple tank gives scientists a way to get answers to questions such as these:
What happens to the wavelength when waves are generated faster and faster? What happens to a wave after it encounters an obstacle? Does the size of the obstacle make a difference? What happens to a wave after it passes through an opening? Does the size of the opening matter? What happens to a wave when it crosses another wave?
We use a ripple tank to understand two unusual light phenomena: interference, which causes, among other things, the colors in a soap bubble or an oil film; and diffraction, which creates colors on a compact disc or a vinyl record.
There’s more than one way to make a ripple tank. We’ll tell you how we made ours, but feel free to improvise.
Required Materials
Books (to act as props that elevate the tank)
A 10’ x 15’ x 2’ clear glass baking dish
Water
A white countertop or a piece of white paper
A flashlight
Aluminum foil
A pencil
An eyedropper or a straw
A pencil, dowel, or other long, narrow cylindrical object that can get wet
A ruler
Activity Directions
- Stack two books on a table or countertop to make two piles about eight inches high each.
- Separate the piles so that you can rest either end of the glass baking dish securely on a stack of books.
- Pour water into the dish to a depth of one inch.
- Check the water from the side and make adjustments (by adding or subtracting books) so that the dish is level and the water is at the same depth everywhere in the dish.
- If your table isn’t white, place the white paper on the table below the dish.
- Cover the head of the flashlight with aluminum foil so that no light can get out.
- Poke a small hole in the middle of the foil with the pencil to make a small light source.
- Your ripple tank is now ready to ripple.
- Turn out all other lights, and hold the lit flashlight two feet over the ripple tank.
- Use the eyedropper to drip a single drop of water into the center of the dish. (If you don’t have an eyedropper, you can use a straw. Put one end of the straw in the water and then place your finger over the other end to create a tight seal. When you release your finger from the end of the straw, the water drips into the tank.)
- Watch the white surface under the ripple tank from below the tank, not through the water.
- You should see wave shadows as you drip drops into the water.
- Generate waves with drips at one end of the ripple tank.
- They will begin as semicircular waves, but by the time they get to the other side they should almost be in straight lines.
- You can imagine that if the ripple tank were long enough, there would be a point where the waves would be in straight lines. To understand diffraction it helps to have straight-line waves.
You can generate straight line waves in a ripple tank with a pencil that is floating at one end of the tank. Gently tap its center downward with another pencil or your finger. You might also try generating regular straight-line waves with a ruler. Hold the ruler so it is resting on the bottom of the dish on one long edge. Move the top back and forth to produce waves. You see the wavelength of these water waves, the distance from one crest to another, as the distance between one bright line on the screen and the next.
Want to Learn More? Read an article related to this activity:
To find this experiment and many more please read Light Action! Amazing Experiments with Optics by Vicki Cobb and Josh Cobb, illustrated by Theo Cobb. To purchase a copy click here.


